

You know the metrics you’re going to measure for social media, the creative and messaging are good to go, what’s next? It’s time to get your revenue and tracking systems in place to prove ROI. Whether you’re an in-house marketer, business leader, or agency consultant, measuring the ROI of your social media strategies is a must.
What is ROI in Social Media?
ROI stands for “return on investment” a measurement of what you got in return for what you invested. In most marketing cases ROI is measured monetary percentage gain from your initial investment. If you invested $500 in labor and $500 in ad spend and drove $2000 in sales your ROI would be 100%
Revenue/Investment X 100 = ROI %
Unless you’re an ecommere brand your social media ROI may not always be able to be easily expressed as a dollar percentage. As we touched on in our post about the key analytics of social media marketing, conversions that matter to your brand is dependant on your business goals. The “revenue” in your ROI could be;
+ Lead forms
+ Increased share of voice/brand awareness
+ Customer reviews and user-generated content
+ Email collections
+ Brand engagement
+ Site traffic
+ App installs
+ Asset downloads
Each of these conversions or “revenue” metrics can be measured differently and represent different stages of the consumer decision cycle.
Why Does Measuring ROI Matter?
Measuring ROI matters for several reasons, but it can be boiled down to 3 core needs.
- It allows you to identify points of the social media strategy that are working and those that aren’t.
- It provides clarity on how social media is impacting other channels of marketing.
- It proves to whoever is signing the check that social media deserves budget.
Proving the ROI in your social media keeps the budget coming, keeps the clients on board, and keeps your organization growing.
Tools to Measure ROI
Unfortunately, there’s not a free tool that lets you measure all aspects of social media ROI in a single place. It can all be pulled into a single reporting spot (with some work), but metrics require different tools. We’re going to cover tools specific to social platforms and some that are common to all.
Facebook Pixel
The Facebook tracking pixel is a powerful tool that gives the world of insight into your audience and helps you build new ones. It collects data about the users who see your ads, visit your page, engage with your website, and can be used to build future audiences. Additionally, the Facebook pixel allows you to track social media conversion actions on your site. This does double duty and handles all of your Instagram tracking as well.
Your Facebook pixel ID can be found in the Ads Manager section of your Facebook account. Once the pixel is generated you can either install the code on your website using Google Tag Manager or it can be installed manually before the tag.
There’s a helpful Google Chrome extension called Facebook Pixel Helper that’s worth installing on your browser to verify that not only is the pixel working correctly, but it also can help troubleshoot tracking issues. Even if you’re not running ads yet, get your Facebook pixel installed as soon as possible to start collecting data.
LinkedIn Insights Tag
The LinkedIn Insights tag is similar to the Facebook pixel in that you can collect data, build audiences, and track conversions, but there are some bonus metrics too (more on those in a minute).
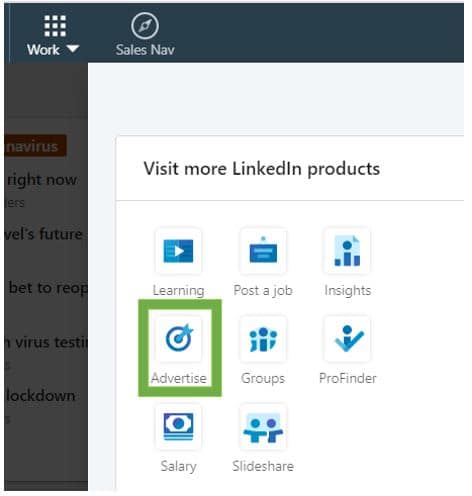
To get a LinkedIn Insights tag you’ll need 2 things; a company LinkedIn page and a Campaign Manager account. Both are free to setup. Once logged in to LinkedIn, you’ll go the “Work” section (it’s just to the right of your picture in the main navigation).
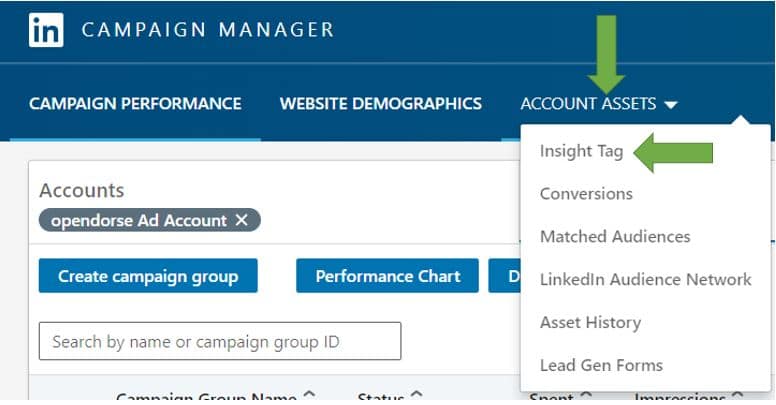
Once in Campaign Manager, click on your ads account (or create a new one) and then in the navigation under “Account Assets” find Insights Tag. From this area, you can create your Insights Tag and setup conversions to track. You’ll get a small block of code that needs to be installed on every page of the site. LinkedIn says to put it in the global footer, but the header works just as well. If you’re using Google Tag Manager there is an easy tag to fire for this that only requires you to add your partner ID.
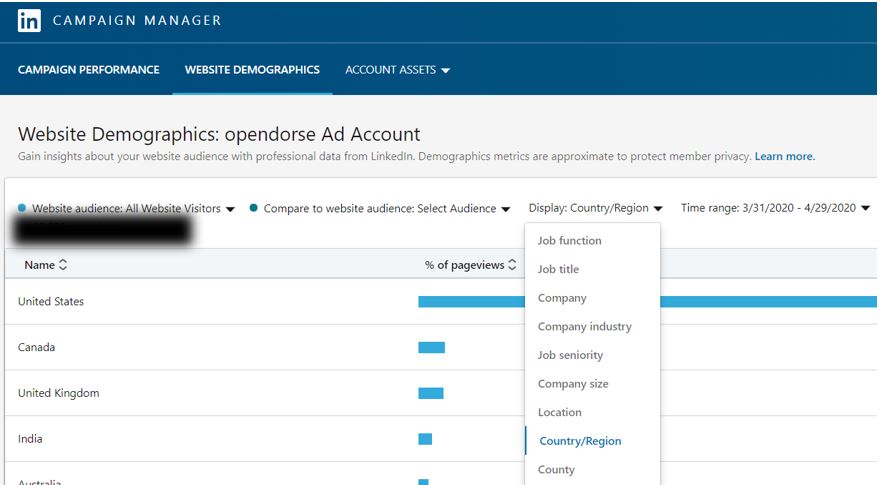
Those “bonus metrics” we talked about will start populating after your tag has been collecting data for a few days and can give you detailed insights into the professional roles, locations, and positions of people who have been visiting your site. The Website Demographics report will allow you to see the aggregate numbers of who’s been to your site by;
+ Job function
+ Job title
+ Company
+ Company industry
+ Job seniority
+ Company size
+ Location
+ Country/Region
+ County
This is informational gold if you’re working on Account-Based Marketing (ABM) or targeting specific industries with your advertising.
Twitter Universal Website Tag and Conversion Tracking
Guess what, it’s time for yet another tracking pixel. The Twitter Universal Website tag, just like all the other pixels tracks data to help you build audiences, remarket to past website visitors when they’re on Twitter, and gather analytics. Twitter Conversion Tracking lets you, well, measure conversions. It’s all from a single tag though.
To set up your Twitter Universal Website Tag you’ll need 3 things.
- Twitter account
- Twitter Ads account
- A credit card linked to your Twitter Ads account (you don’t have to spend anything, but the “Tools” section of Twitter Ads is unavailable until you have a credit card linked).
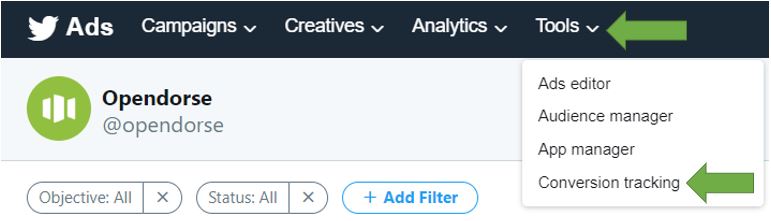
You’ll log into Twitter Ads either from ads.twitter.com or from the “More” section of your account. Once in Twitter Ads you’ll go to the far right and select the Tools menu, and find Conversion Tracking. You’ll now be given another block of code to install on the site. If you’re doing it manually this code goes before the closing tag of all pages on your site. If you’re not using Google Tag Manager at this point you’re probably pretty tired of installing this manually, it might be a good idea to check out GTM. If you’re using Google Tag Manager (good choice) there’s super easy integration for this.
Once the tag is tracking correctly (it could take up to 24hrs) you’ll be able to create conversion events. These can be Single Event conversion (which require another tag) or more traditional conversion types like;
+ Site visit
+ Purchase
+ Download
+ Sign up
+ Or create a custom conversion
As you create conversions you can set the attribution window for each independently, which is handy if some of your campaigns are going to have a longer sales cycle.
Google Analytics
There are several other platforms available for website analytics but Google Analytics is one of (if not) the most popular. Chances are that if you’re running Adobe Analytics/Omniture you probably not reading this guide. Google Analytics is a free website statistics software that provides a host of information about your website including the number of visitors (can pick any date range), how they got to your site, where they’re located, what content they looked at, and conversion metrics.
Just like with your Facebook pixel, get Google Analytics installed on your site as quickly as possible. Google has no retroactive data on your site so until you start tracking it, nothing exists.
To get Google Analytics setup head to analytics.google.com and follow the instructions to create an account. You’ll be given a Tracking ID number that starts with UA- and a Global Site Tag. The Global Site Tag needs to be installed on every page of your site. Generally, it’s placed in the header area. Google Tag Manager has an easy way to deploy it as well (are you seeing a pattern…. use Tag Manager). Stay tuned for our crash course in Google Analytics where we’ll dive into the world of metrics you can find inside of GA.
UTM URLs
UTMs are one of the easiest and most valuable tools for properly attributing traffic and conversions. UTMs are snippets of text added at the end of your URL that allow you to manually input the source, medium, campaign, content, and more. This is especially important for social media because as we mentioned in our Key Analytics of Social Media Marketing post, Google Analytics doesn’t always get the source and medium right.
+ UTMs can track
+ A campaign (the campaign name)
+ A source (like Google, Facebook, Instagram, LinkedIn, etc)
+ A medium (like social, CPC, display, etc)
+ An ad or piece of content (generally for social you’ll use the name of the ad or post)
+ A term used to trigger an ad (this is only used with Google Ads)
At a bare minimum, your social campaigns should include the UTMs for source, medium, and campaign. Google has a basic free tool for building these here. If you’re interested in learning more about how to leverage UTMs, stay tuned for our guide coming soon.
Get to Measuring
At this point, you should have;
+ Google Analytics tracking on your website
+ Your Facebook pixel installed
+ Your Twitter Universal Website Tag installed
+ Your LinkedIn Insights tag gathering data
+ An idea of what you’ll be putting in your UTM’d URLs.
Now, you’re ready to start executing on social media campaigns and proving your ROI to the world (or at least whoever is signing the checks).


